Dedicated DHCP & DHCP Relay Agent Lab (Packet Tracer)
Theory prerequisites
Read Switches vs Routers and Subnetting & DHCP. Return to the Lab-Aligned Learning Path after verification.
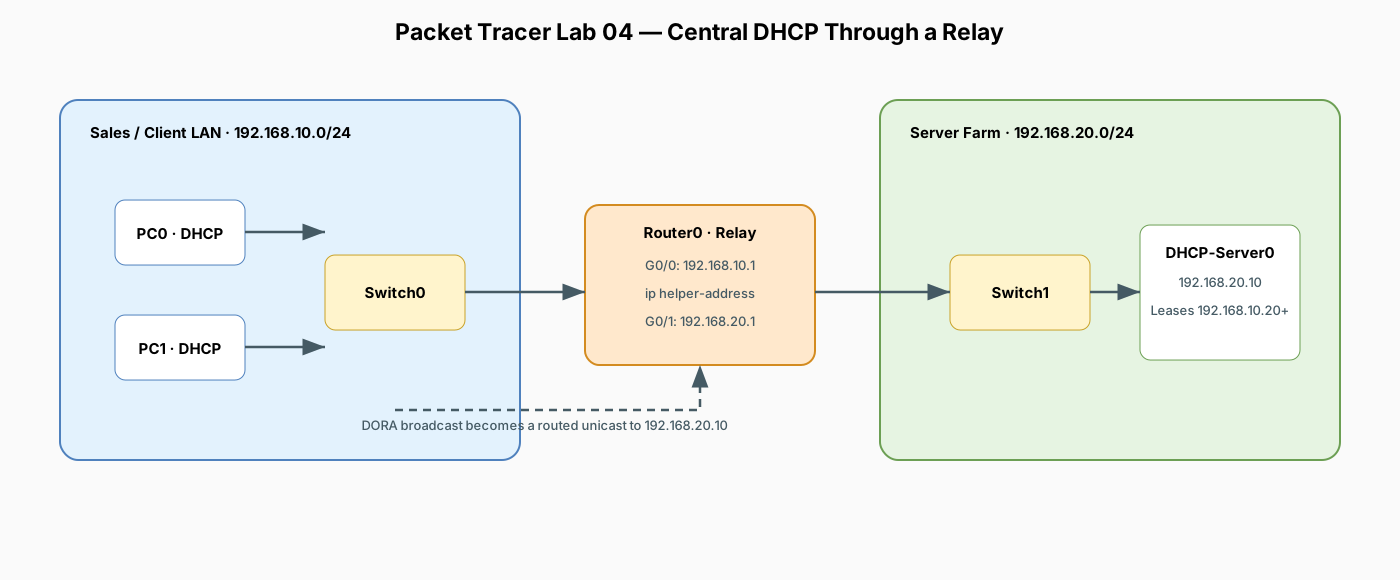
This lab is designed to take you from DHCP fundamentals to advanced enterprise implementations. You will build and observe:
- Part 1: Basic Router-Based DHCP Server (Local LAN pool with exclusions and options)
- Part 2: The DORA Process Deep-Dive (Discover, Offer, Request, Acknowledge in Packet Tracer Simulation Mode)
- Part 3: Enterprise DHCP Relay Agent (
ip helper-address) (Centralized DHCP server providing leases to a remote subnet across a router)
Topology
Addressing Plan
| Device | Interface | IP Address | Subnet Mask | Default Gateway | Role |
|---|---|---|---|---|---|
| Router0 | Gig0/0 |
192.168.10.1 |
255.255.255.0 |
— | LAN 1 Gateway (Relay Agent via ip helper-address) |
| Router0 | Gig0/1 |
192.168.20.1 |
255.255.255.0 |
— | LAN 2 Gateway (Server Farm) |
| DHCP-Server0 | Fa0 |
192.168.20.10 |
255.255.255.0 |
192.168.20.1 |
Centralized Dedicated DHCP Server |
| PC0 | Fa0 |
via DHCP | via DHCP | 192.168.10.1 |
Client in LAN 1 (Dynamic Lease: 192.168.10.20+) |
| PC1 | Fa0 |
via DHCP | via DHCP | 192.168.10.1 |
Client in LAN 1 (Dynamic Lease: 192.168.10.21+) |
1. Place and Cable Devices
Devices Required
- 2x Generic PC (
PC0,PC1) - 2x Switch (
2960-24TT:Switch0,Switch1) - 1x Router (
1941:Router0) - 1x Server (
DHCP-Server0)
Cabling Connections (Copper Straight-Through)
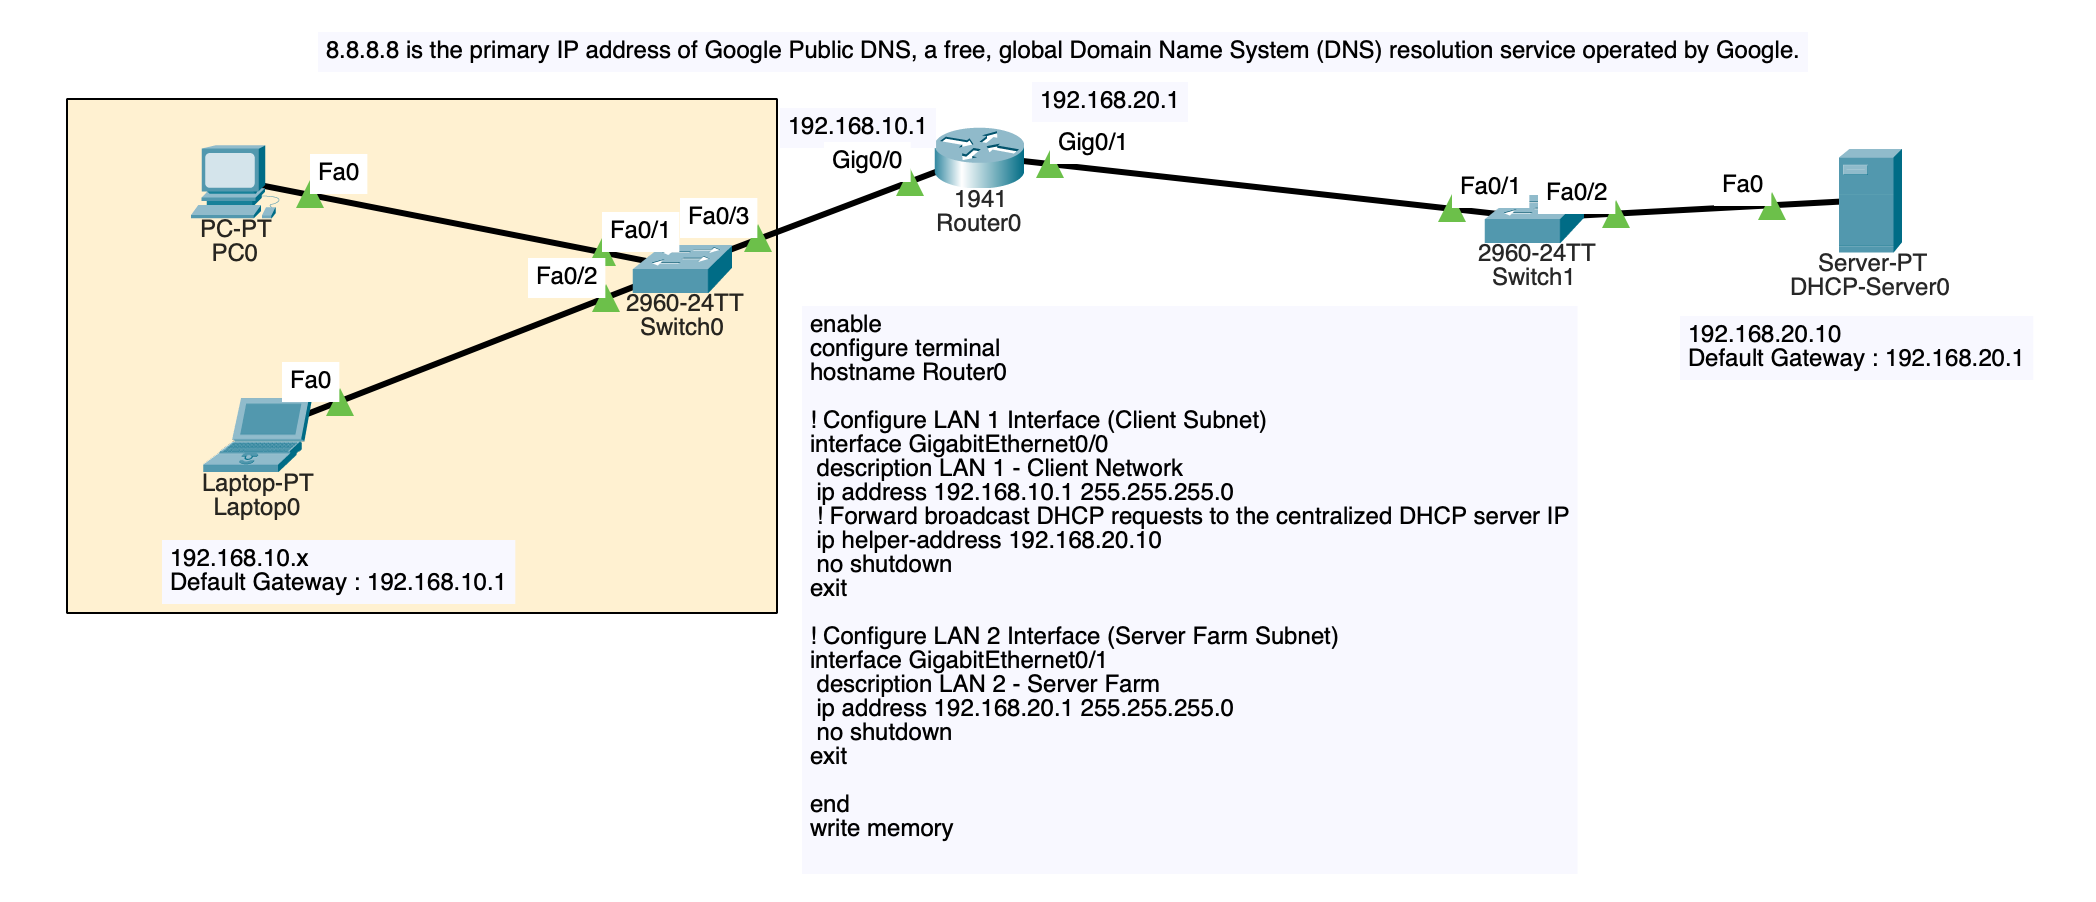
PC0(FastEthernet0) <—>Switch0(FastEthernet0/1)PC1(FastEthernet0) <—>Switch0(FastEthernet0/2)Switch0(FastEthernet0/3) <—>Router0(GigabitEthernet0/0)Router0(GigabitEthernet0/1) <—>Switch1(FastEthernet0/1)Switch1(FastEthernet0/2) <—>DHCP-Server0(FastEthernet0)
2. Router0 Configuration
Open Router0 CLI and configure the interface IP addresses and the DHCP relay helper:
enable
configure terminal
hostname Router0

! Configure LAN 1 Interface (Client Subnet)
interface GigabitEthernet0/0
 description LAN 1 - Client Network
 ip address 192.168.10.1 255.255.255.0
 ! Forward broadcast DHCP requests to the centralized DHCP server IP
 ip helper-address 192.168.20.10
 no shutdown
exit

! Configure LAN 2 Interface (Server Farm Subnet)
interface GigabitEthernet0/1
 description LAN 2 - Server Farm
 ip address 192.168.20.1 255.255.255.0
 no shutdown
exit

end
write memory
3. Dedicated DHCP-Server0 Configuration
Open DHCP-Server0:
Step A: Configure Static IP on the Server
Go to Desktop > IP Configuration:
- IP Address:
192.168.20.10 - Subnet Mask:
255.255.255.0 - Default Gateway:
192.168.20.1 - DNS Server:
8.8.8.8
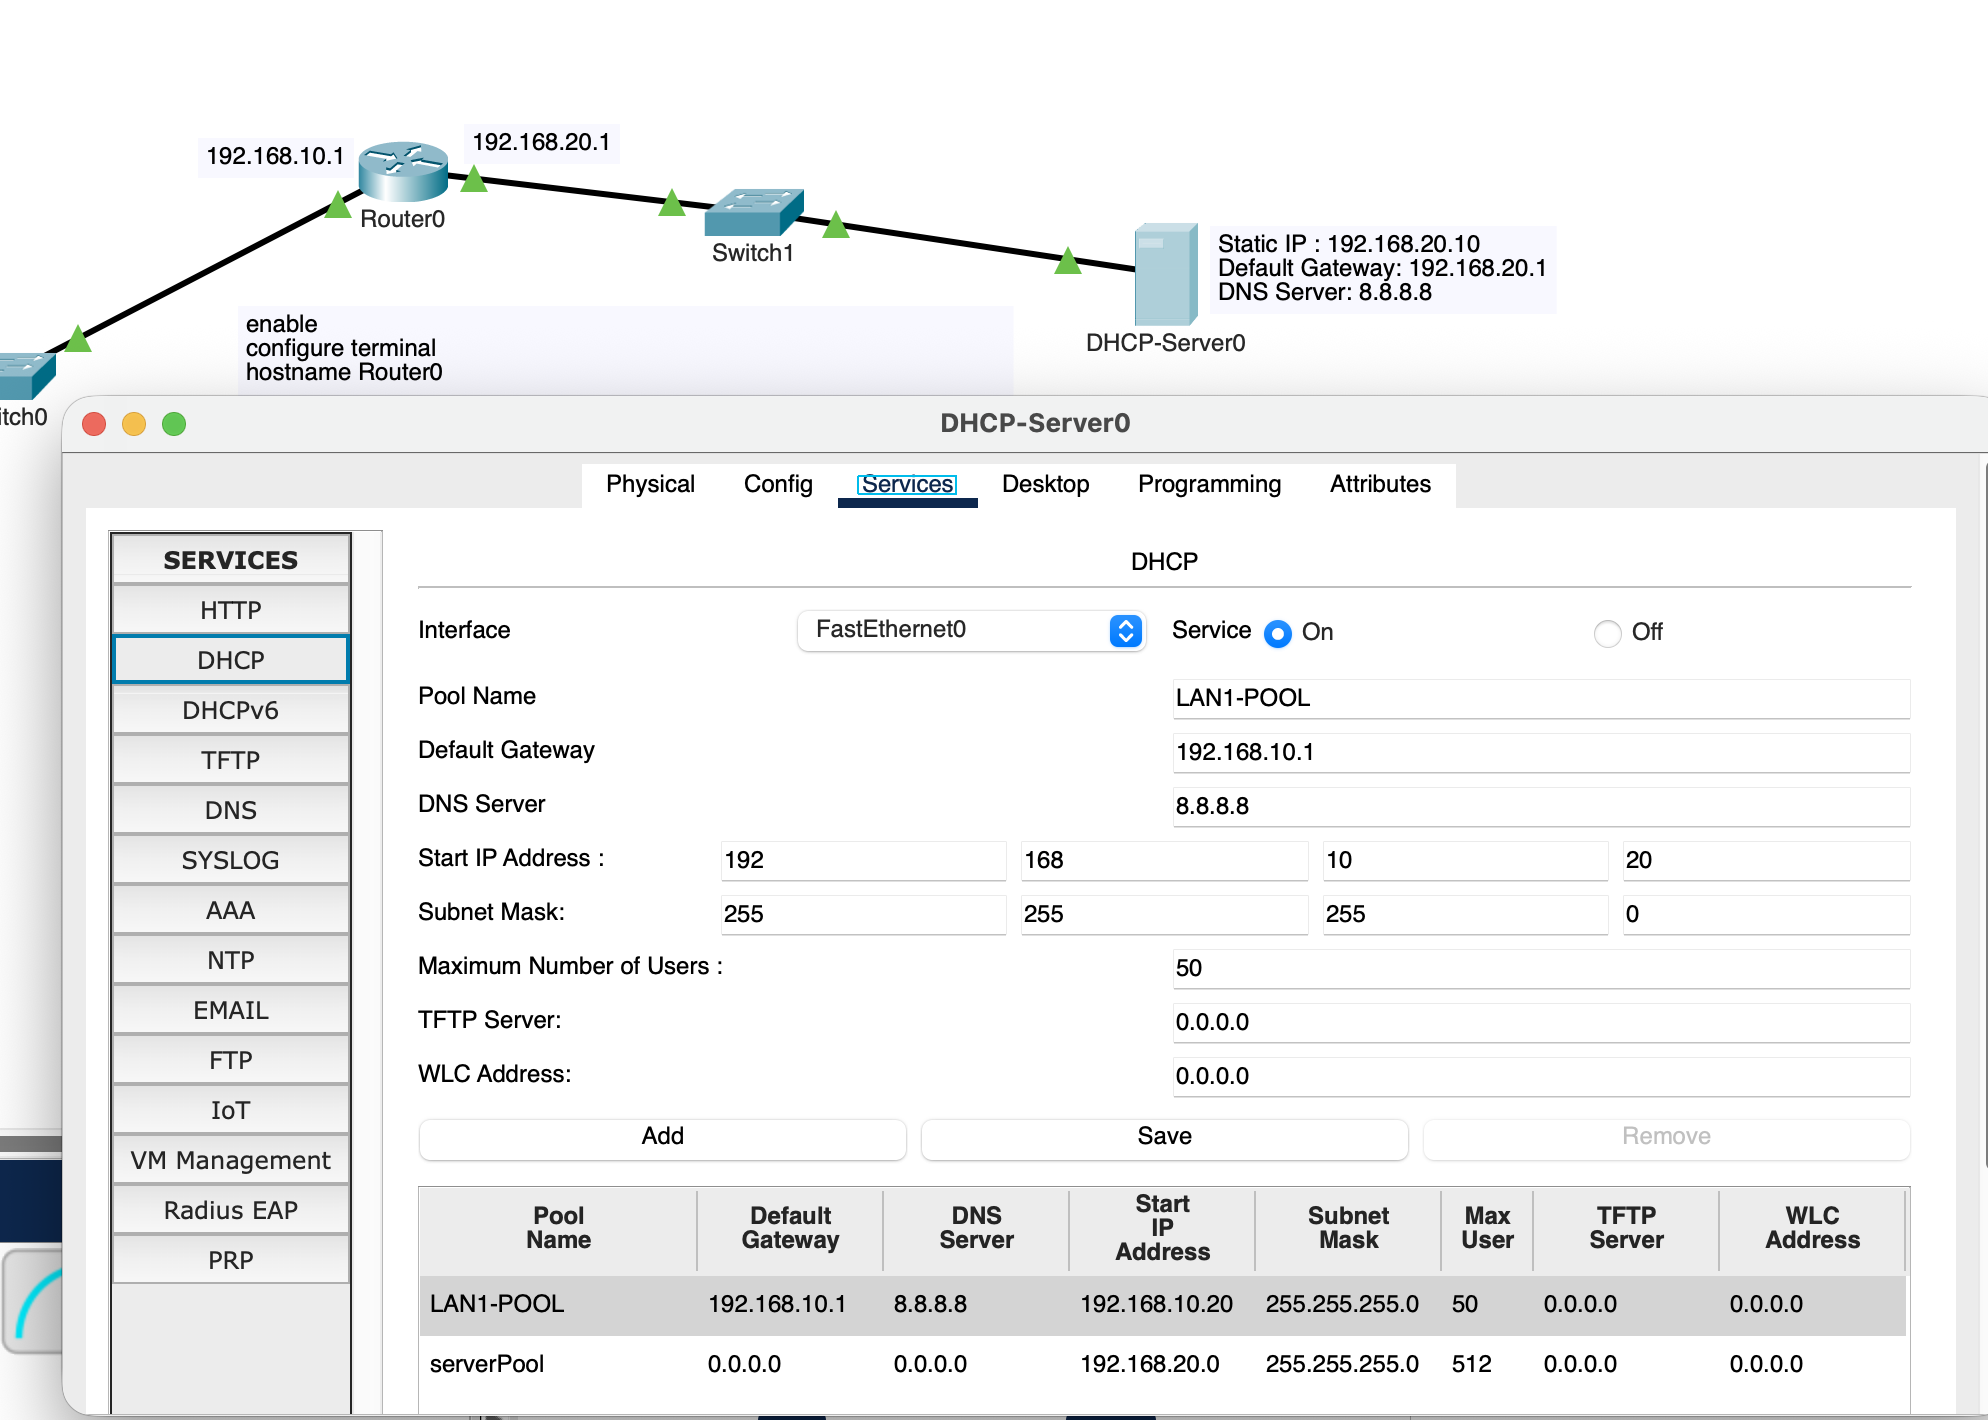
Step B: Configure the DHCP Service for Remote Subnet
Go to Services tab > DHCP:
- Service: Toggle On
- Pool Name:
LAN1-POOL - Default Gateway:
192.168.10.1 - DNS Server:
8.8.8.8 - Start IP Address:
192.168.10.20 - Subnet Mask:
255.255.255.0 - Maximum number of Users:
50 - Click Add (or Save)
(Optional: You can also keep the default serverPool for the local 192.168.20.0/24 subnet if you add servers later).
4. Alternative Implementation: Router as the DHCP Server
If you prefer to run DHCP directly on the Cisco router without a separate server device, configure these commands on Router0 instead of ip helper-address:
! Exclude static infrastructure IPs from being assigned
ip dhcp excluded-address 192.168.10.1 192.168.10.19

! Define DHCP Pool for LAN 1
ip dhcp pool POOL-LAN1
 network 192.168.10.0 255.255.255.0
 default-router 192.168.10.1
 dns-server 8.8.8.8
 domain-name company.local
 lease 7
exit
5. Verification and Testing
A. Test DHCP on Client PCs
- Open PC0 > Desktop > IP Configuration and click DHCP.
- Verify that
PC0receives: - IP Address:
192.168.10.20 - Subnet Mask:
255.255.255.0 - Default Gateway:
192.168.10.1 - DNS Server:
8.8.8.8 - Repeat on PC1; it should receive
192.168.10.21.
B. Command Prompt Verification
On PC0 Command Prompt, test releasing and renewing leases:
C. Ping Test Across Subnets
From PC0, ping the DHCP server in LAN 2:
6. Understanding the DORA Process (Simulation Mode Walkthrough)
Switch Packet Tracer to Simulation Mode (Shift + S), set event filters to DHCP and ICMP, and click ipconfig /renew on PC0 to watch each step:
- 1. Discover (D): PC0 has no IP address, so it broadcasts
255.255.255.255asking "Is there a DHCP server available?" - 2. Relay / Forward: Router0 intercepts the Layer 2 broadcast on
Gig0/0, wraps it in a unicast packet, and forwards it to192.168.20.10viaip helper-address. - 3. Offer (O): DHCP-Server0 replies with an available IP offer (
192.168.10.20), default gateway, and lease parameters. - 4. Request (R): PC0 formally broadcasts: "I accept the offer of
192.168.10.20from DHCP-Server0." - 5. Acknowledge (A): The DHCP server sends the final ACK confirmation, committing the lease to its database.
7. Key Troubleshooting & Observation Matrix
| Issue / Command | Cause & Solution | Concept Explained |
|---|---|---|
PC gets 169.254.x.x (APIPA) |
DHCP request timed out; check ip helper-address on Router0 or verify DHCP service is toggled On. |
APIPA is assigned automatically by the OS when DHCP fails. |
show ip dhcp binding (on Router) |
Displays all active MAC-to-IP lease assignments. | Confirms which host has claimed which address. |
show ip dhcp pool (on Router) |
Shows total addresses, leased count, and remaining available IPs. | Useful for monitoring pool exhaustion. |
Why ip helper-address is required |
Routers drop Layer 2 broadcasts by default. The helper converts UDP broadcasts (ports 67/68) into unicast packets across subnets. | DHCP Relay enables one central DHCP server to manage hundreds of branch subnets. |