Terraform Lab 04 — VMs, Private DNS & Verification
The last foundational lab: put actual machines in the subnets, replace PT's "Server-PT" with a real VM, and replace the lab-5 DNS server with Cloud DNS — then verify connectivity the same way you did in Packet Tracer (ping, curl, name resolution).
Lab contract
| Item | This lab |
|---|---|
| Execution model | Final cumulative stage in the Labs 02–04 working directory |
| Starts from | VPC/subnets from Lab 02 and NAT/firewall policy from Lab 03 |
| Adds | Two VMs, one private DNS zone, and one A record |
| Ends with | Verify the complete foundation, then destroy the shared Labs 02–04 state |
| Next | Lab 05 — Standalone Two-Tier Scenario |
Resource summary
| Terraform block | Count | Purpose | Depends on |
|---|---|---|---|
google_compute_instance.frontend_vm |
1 | Public test client/bastion tagged for restricted SSH | Client subnet and Lab 03 SSH rule |
google_compute_instance.backend_vm |
1 | Private nginx server using Cloud NAT for egress | Server subnet, NAT, and IAP SSH rule |
google_dns_managed_zone.corp_internal |
1 | Private corp.internal. namespace attached to the VPC |
Lab 02 VPC |
google_dns_record_set.backend_a |
1 | Resolves the backend name to its computed private address | DNS zone and backend VM |
Concept Map
| Packet Tracer | GCP / Terraform |
|---|---|
| PC-PT / Server-PT devices | google_compute_instance (VMs) |
| Desktop → IP Config → DHCP | Automatic — every VM gets DHCP from its subnet |
| Lab-5 DNS server (A records) | google_dns_managed_zone + google_dns_record_set |
Command Prompt → ping / ipconfig |
gcloud compute ssh → ping / ip addr |
The scenario
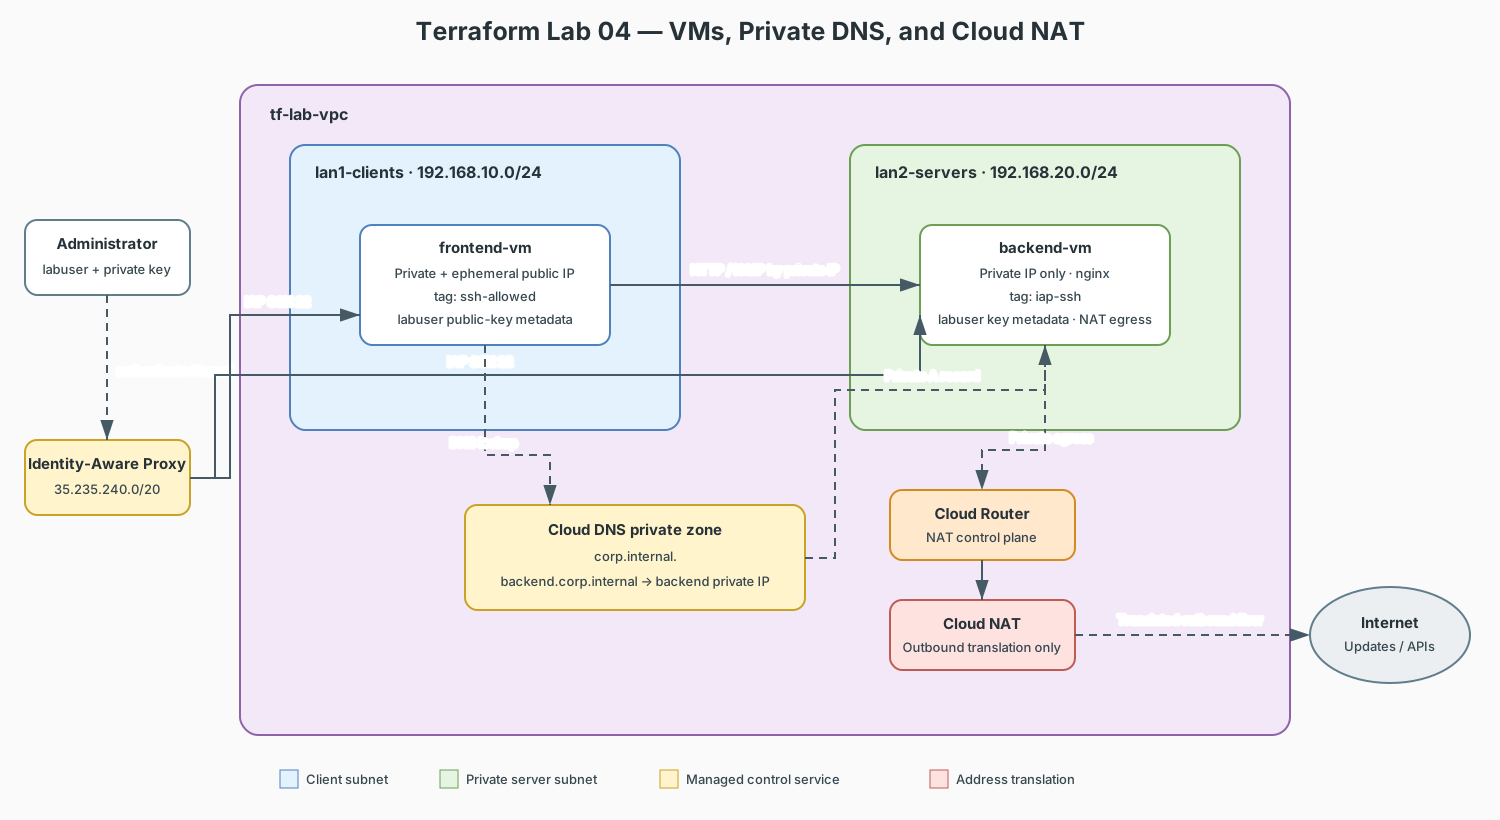
Color key: blue = client subnet, green = private server subnet, yellow = managed control service, and red = address translation.
Two VMs mirror Packet Tracer's “client talks to a server on another subnet,” while the diagram separates data flows from DNS, administration, and outbound translation.
main.tf (append to labs 02+03)
# --- Frontend VM: plays the "PC0" role, reachable via SSH ---
resource "google_compute_instance" "frontend_vm" {
  name         = "frontend-vm"
  machine_type = "e2-micro"          # free-tier eligible
  zone         = "${var.region}-a"

  tags = ["ssh-allowed"]             # picks up the lab-03 SSH firewall rule

  metadata = trimspace(var.ssh_public_key) == "" ? {} : {
    block-project-ssh-keys = "TRUE"
    enable-oslogin         = "FALSE"
    ssh-keys               = "${var.ssh_user}:${trimspace(var.ssh_public_key)}"
  }

  boot_disk {
    initialize_params {
      image = "debian-cloud/debian-12"
    }
  }

  network_interface {
    subnetwork = google_compute_subnetwork.lan1_clients.id
    access_config {}                 # empty block = ephemeral public IP
  }
}

# --- Backend VM: plays the "DHCP-Server0" role, private only ---
resource "google_compute_instance" "backend_vm" {
  name         = "backend-vm"
  machine_type = "e2-micro"
  zone         = "${var.region}-a"

  tags = ["iap-ssh"]

  metadata = trimspace(var.ssh_public_key) == "" ? {} : {
    block-project-ssh-keys = "TRUE"
    enable-oslogin         = "FALSE"
    ssh-keys               = "${var.ssh_user}:${trimspace(var.ssh_public_key)}"
  }

  boot_disk {
    initialize_params {
      image = "debian-cloud/debian-12"
    }
  }

  network_interface {
    subnetwork = google_compute_subnetwork.lan2_servers.id
    # no access_config → NO public IP; outbound goes through Cloud NAT
  }

  metadata_startup_script = "apt-get update && apt-get install -y nginx"
}

# --- Private DNS: replaces the lab-5 DNS server ---
resource "google_dns_managed_zone" "corp_internal" {
  name        = "corp-internal"
  dns_name    = "corp.internal."
  description = "Private zone for internal service names"

  visibility = "private"

  private_visibility_config {
    networks {
      network_url = google_compute_network.lab_vpc.id
    }
  }
}

resource "google_dns_record_set" "backend_a" {
  name         = "backend.${google_dns_managed_zone.corp_internal.dns_name}"
  type         = "A"
  ttl          = 300
  managed_zone = google_dns_managed_zone.corp_internal.name

  rrdatas = [google_compute_instance.backend_vm.network_interface[0].network_ip]
}
Systematic deployment and verification
Work through the lab in order so each test proves one layer before moving to the next.
Step 1 — Prepare an SSH identity
Use a dedicated key for the lab. The first command shows whether it already exists; generate it only when it is missing.
test -f "$HOME/.ssh/network_lab" || \
  ssh-keygen -t ed25519 -f "$HOME/.ssh/network_lab" -C "network-lab"
The private key stays on your computer. Terraform receives only
network_lab.pub and installs it for labuser. Supplying an empty key is
supported for teardown, but an SSH key is required when you want to connect.
Step 2 — Understand the administration path
| VM | Addressing | SSH path | Required network control |
|---|---|---|---|
| Frontend | Ephemeral public IPv4 | Your computer → IAP tunnel → VM | IAP range allowed for the ssh-allowed tag |
| Backend | Private IPv4 only | Your computer → IAP tunnel → VM | IAP range allowed for the iap-ssh tag |
Both VMs use Identity-Aware Proxy for administration, so no administrator IP
variable or public SSH firewall rule is needed. The firewall accepts TCP 22 only
from Google's IAP range (35.235.240.0/20). The connecting identity must have
roles/iap.tunnelResourceAccessor.
Step 3 — Configure deterministic VM authentication
Both VM resources use the same conditional metadata block:
variable "ssh_user" {
  description = "Linux user to create for SSH access"
  type        = string
  default     = "labuser"
}

variable "ssh_public_key" {
  description = "OpenSSH public key used to access both VMs; omit for destroy"
  type        = string
  default     = ""
}

metadata = trimspace(var.ssh_public_key) == "" ? {} : {
  block-project-ssh-keys = "TRUE"
  enable-oslogin         = "FALSE"
  ssh-keys               = "${var.ssh_user}:${trimspace(var.ssh_public_key)}"
}
This connects three separate controls: the firewall permits the TCP connection, the VM metadata creates the Linux user and authorized key, and your private key proves your identity.
Step 4 — Enable APIs and apply
gcloud services enable dns.googleapis.com iap.googleapis.com

terraform apply \
  -var="project_id=YOUR_PROJECT_ID" \
  -var="ssh_public_key=$(cat ~/.ssh/network_lab.pub)"
Review the plan before approving it. It should create two VMs, the firewall and NAT resources, one private DNS zone, and one DNS record.
Step 5 — Verify from the outside in
First confirm that both instances exist and note their public and private addresses:
Connect to the frontend VM through IAP:
gcloud compute ssh labuser@frontend-vm \
  --zone=us-central1-a \
  --tunnel-through-iap \
  --ssh-key-file="$HOME/.ssh/network_lab"
From the frontend shell, verify the layers in order:
ping -c3 <backend-vm-internal-ip> # Layer 3 reachability
getent hosts backend.corp.internal # Private DNS
curl http://backend.corp.internal  # nginx application response
Finally, leave the frontend shell and connect to the private backend through IAP, then verify Cloud NAT egress:
gcloud compute ssh labuser@backend-vm \
  --zone=us-central1-a \
  --tunnel-through-iap \
  --ssh-key-file="$HOME/.ssh/network_lab"

curl -4 -s ifconfig.me
Step 6 — Interpret failures by layer
| Symptom | Layer to check |
|---|---|
| SSH timeout | IAP API, IAP IAM role, VM tag, and IAP firewall rule |
Permission denied (publickey) |
Username, public-key variable, and matching private key |
| IAP permission error | IAP API and roles/iap.tunnelResourceAccessor for your identity |
| Backend name does not resolve | Private zone attachment and DNS record |
| Backend responds by IP but not HTTP | nginx startup-script completion and service status |
| Backend has no outbound internet | Cloud Router, NAT, and included server subnet |
What to notice
- DHCP is invisible. Every VM gets its private IP from the subnet automatically — the PT "IP Configuration → DHCP" step still happens, you just don't configure it. Reservation is possible, but rarely needed.
access_config {}is the entire difference between "has public IP" and "private VM." One empty block.- Startup script ≈ PT's Services tab. Instead of toggling HTTP on the server GUI, the VM installs nginx on first boot — config as text.
- The A record references the VM's IP attribute
(
network_interface[0].network_ip) — you don't hardcode10.xvalues; the dependency graph wires them together. --tunnel-through-iapis how you SSH to a machine with no public IP — the cloud equivalent of PT letting you click into a device with no route to you.
Teardown
Verify nothing remains: gcloud compute instances list should be empty.
Checklist — Terraform foundations complete when:
- Both VMs up; frontend SSH-able, backend private-only
-
backend.corp.internalresolves from frontend-vm (private DNS works) - backend-vm reaches the internet through Cloud NAT
-
terraform destroyleft zero resources (and zero billing)
Where to go next — the advanced labs
You now have every primitive used by the existing labs:
- Stage 05 — Two-Tier Networking Scenario — this same architecture, end-to-end
- Stage 06 — VPC Peering & Shared VPC — connecting two VPCs (multi-router, cloud-style)
- Stage 07 — L4 & L7 Load Balancing — the cloud version of "the server"
- Stage 08 — IPsec VPN & BGP — hybrid cloud, the far edge of networking