F5 XC Lab 02 — Manual Deployment in the F5 XC Console
In Lab 01 you built the two-VPC landing zone and a private NGINX origin. Now you walk the manual deployment path in the F5 XC Console so that when Terraform automates it in Labs 03–04, you know exactly what the code is doing.
Lab contract
| Item | This lab |
|---|---|
| Execution model | ClickOps in the F5 XC Console + one GCP Compute Engine VM |
| Starts from | Lab 01 VPCs and web-inside running; an F5 XC tenant (a free trial works) |
| Creates | Site token, one registered CE node, origin pool, health check, HTTP load balancer with WAF |
| Ends with | web-inside reachable in your browser via an F5 XC load balancer URL |
| Next | Lab 03 — Terraform Dual-Provider Setup |
Object summary
| F5 XC / GCP object | Count | Purpose |
|---|---|---|
| Site token | 1 | One-time credential a CE node presents to join a site |
ce-gcp-01 (Compute Engine VM, 2 NICs) |
1 | The Customer Edge node itself |
| XC Site object (auto-registered) | 1 | Logical site the CE joins |
| Origin pool | 1 | "These backends, on this site, on the inside network" |
| Health check | 1 | TCP/HTTP liveness gating traffic to the origin |
| HTTP load balancer + app firewall | 1 | Global anycast VIP + WAF in front of the pool |
Object chain at a glance
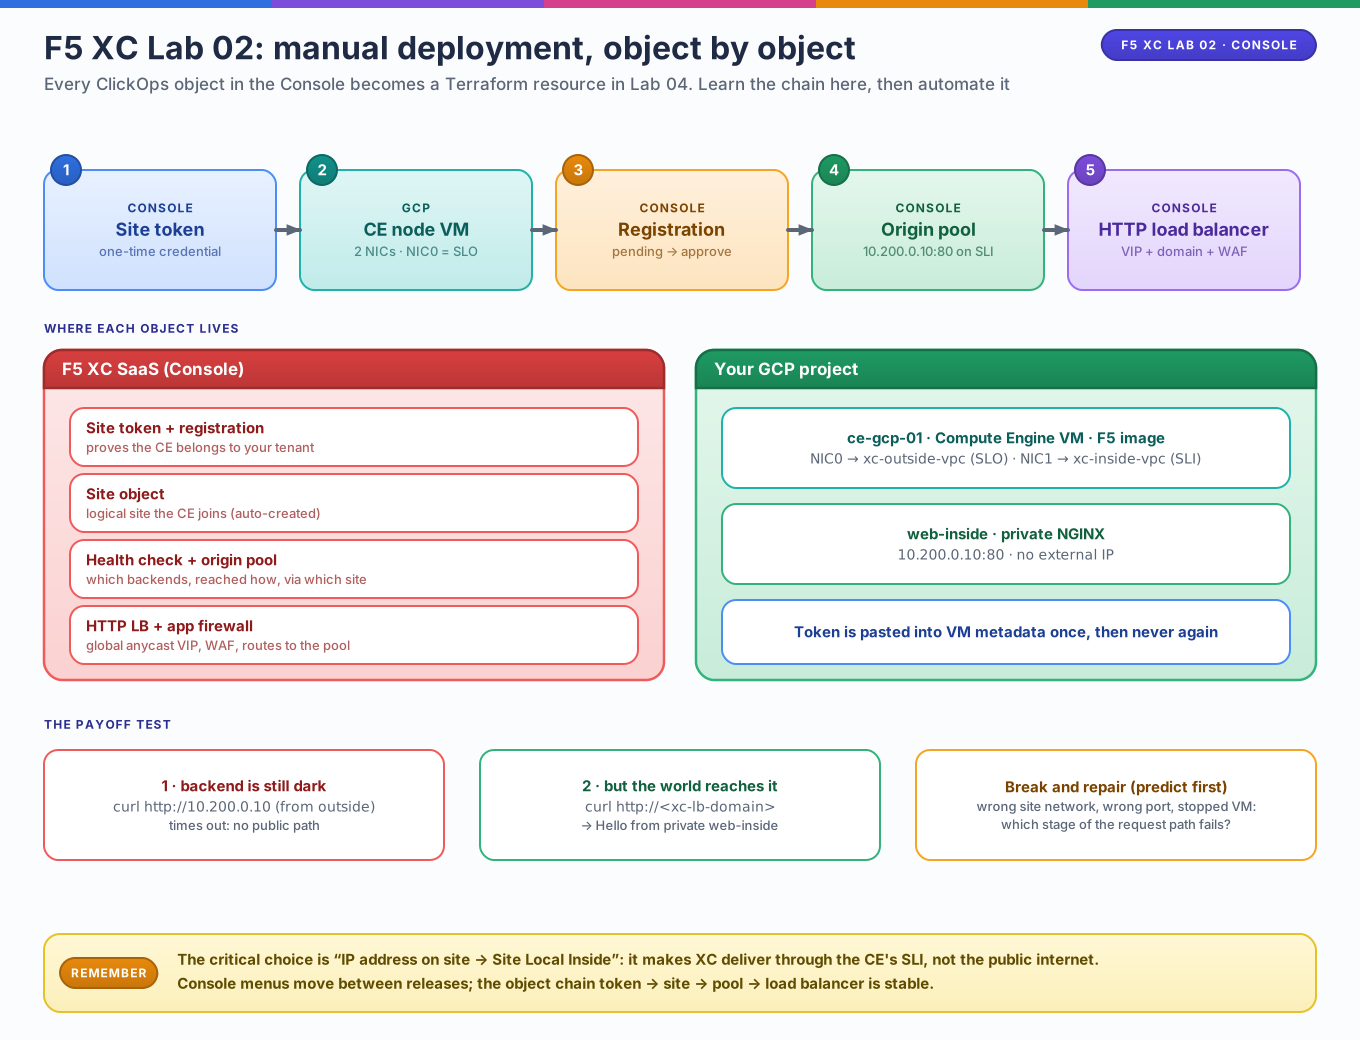
Editable source: f5-lab02-manual-deploy.drawio
1. Generate a site token
The site token is how a new CE node proves it belongs to your tenant.
In the F5 XC Console:
- Switch to the Multi-Cloud Network Connect service.
- Go to Manage → Site Management → Site Tokens.
- Add Site Token, name it
gcp-lab-token, and copy the generated value — you paste it into the CE VM once, then never again.
Console navigation moves
F5 renames Console paths periodically. If a menu item isn't where this lab says, search the Console's object list for Site Tokens or Registrations — the concepts are stable even when the menus shift.
2. Deploy the CE node on GCP
The CE is a Compute Engine VM running F5's certified image with two network interfaces — NIC 0 must be the outside (SLO) network because XC assigns SLO to the first interface.
In GCP Console → Compute Engine → Create instance (or Marketplace → F5 Distributed Cloud Customer Edge):
| Setting | Value | Why |
|---|---|---|
| Name | ce-gcp-01 |
Becomes the node name in XC |
| Machine type | e2-standard-4 (4 vCPU / 16 GB) |
CE minimum for a lab; prod uses n1-standard-4+ |
| Boot image | F5 XC certified CE image | Contains the Volterra CE software |
| NIC 0 | slo-subnet (xc-outside-vpc), ephemeral external IP |
SLO — control plane + RE tunnels |
| NIC 1 | sli-subnet (xc-inside-vpc), no external IP |
SLI — reaches web-inside |
Metadata → ssh-keys |
Your public key | Emergency console access |
Then inject the token. The CE reads its registration token from instance
metadata — the exact key name is shown on the Console's GCP site-deployment
page (it is passed alongside the token when XC generates a deploy bundle). Add
it as a metadata entry on the VM, or use the Console's "Deploy on GCP" guided
flow, which hands you either a copy-pasteable gcloud/terraform command or a
pre-wired marketplace launch — pick the path your Console version offers, the
result is the same VM.
3. Watch registration and approve the node
- After ~2–3 minutes, go to Site Management → Registrations.
- Your node appears as pending. Approve it — this is a deliberate control-plane step so a stolen token alone can't silently join a site.
- In Sites, confirm the new site reports healthy with SLO and SLI
interfaces both
UP.
sequenceDiagram
    participant CE as CE node (ce-gcp-01)
    participant CP as F5 XC control plane
    participant You as Console admin
    CE->>CP: Hello — here is my site token + hardware ID
    CP-->>You: Pending registration
    You->>CP: Approve
    CP->>CE: Cert bundle + site config (SLO/SLI roles)
    CE->>CP: Status: UP, inside network 10.200.0.0/24 learned
4. Build the origin pool
The origin pool answers: "which backends, reachable how, through which site?"
Multi-Cloud Network Connect → Manage → Load Balancers → Origin Pools → Add:
| Field | Value |
|---|---|
| Name | web-inside-pool |
| Origin server → type | IP address on site |
| IP | 10.200.0.10 |
| Site | your GCP site, network = Site Local Inside |
| Port | 80 |
The critical choice is "on site → inside network" — that tells XC to deliver traffic through the CE's SLI interface, not over the public internet.
Attach a simple health check (tcp on 80, or http GET /) so the pool
goes dark instead of black-holing if the VM dies.
5. Publish with an HTTP load balancer + WAF
Manage → Load Balancers → HTTP Load Balancers → Add:
| Field | Value |
|---|---|
| Name / domain | web-gcp → XC gives you an auto-generated *.ves.app-style domain |
| Advertise | Public (on Regional Edges worldwide) |
| Origin pool | web-inside-pool |
| Web Application Firewall | Enable — the default app firewall is fine for the lab |
| HTTPS | Optional lab shortcut: HTTP-only first, add certs later |
Verify — the payoff moment
# 1. Backend is still dark
gcloud compute instances describe web-inside --zone=us-central1-a \
  --format='value(networkInterfaces[0].accessConfigs)'   # → empty

# 2. But the world can reach it through F5 XC
curl -v http://YOUR-LB-DOMAIN/
# → <h1>Hello from private web-inside</h1>
flowchart LR
    B[Your browser] -->|HTTP to XC VIP| RE[Regional Edge]
    RE -->|inside tunnel| SLO[CE SLO NIC]
    SLO --> SLI[CE SLI NIC]
    SLI -->|HTTP 10.200.0.10:80| W[web-inside]
    W -.no return path to internet.- RE
What to notice
- The backend never had a public IP — yet it serves global traffic. The RE terminates client connections; the CE carries them inward.
- Registration required human approval. Control-plane trust is explicit.
- The origin pool's "inside network" flag is the whole trick — without it,
XC would try to reach
10.200.0.10from the public side and fail. - WAF ran before any Terraform. Keep that ordering in mind: Lab 04 turns
this same WAF into a
volterra_app_firewallresource.
Break and repair (predict first)
- Stop
web-inside. Predict: health check fails → pool unhealthy → LB returns 503/No healthy upstream, not a timeout. Verify, restart, re-verify. - Remove the
xc-origintag from the VM. Predict which layer breaks and where you'd see it in GCP firewall logs vs XC monitoring.
Checklist before lab 03
- Site shows healthy with both SLO and SLI
UP -
curlto the LB domain returns your NGINX page - You can explain the full path: browser → RE → SLO → SLI →
10.200.0.10 - You can name the three console objects Terraform will own (site, origin pool, HTTP LB + WAF)