Getting Started
This page takes you from zero to a deployed proxy. Total time: about an hour (most of it waiting for the eval org to provision).
By the end you can...
- Explain what the org, environment and environment group you just created are for.
- Authenticate
apigeecliand prove connectivity. - Deploy
labs-proxyand see its first response in Trace.
1. Provision an Apigee evaluation org
- Create or pick a GCP project at console.cloud.google.com and enable billing (the eval org itself is free).
-
Enable the Apigee API:
-
Open Apigee in the console and click through the evaluation provisioning wizard. Provisioning takes 30–45 minutes; you get one environment (
eval) in one environment group (eval-group) and a single region.
When it finishes, note three values — you'll use them constantly:
export APIGEE_ORG=my-org-name            # usually equals the GCP project ID
export APIGEE_ENV=eval
export APIGEE_HOST=eval-group.my-org-name.apigee.net   # from Provisioning → hostnames
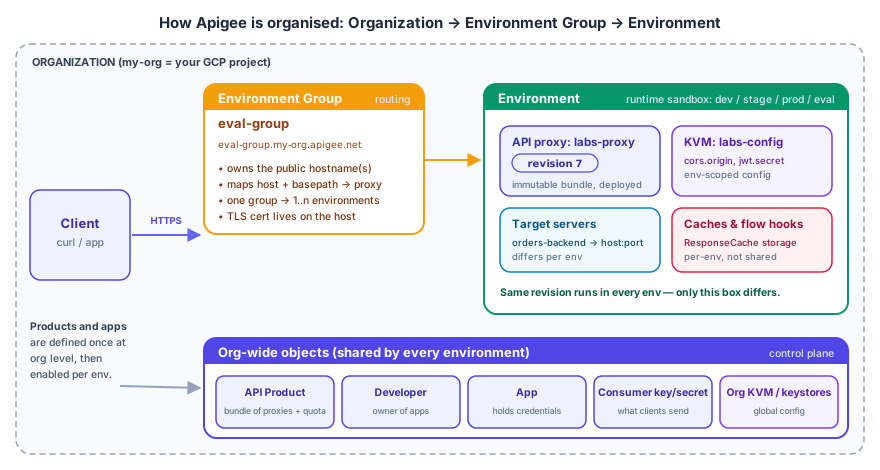
Read the three exports above against this picture: APIGEE_ORG is the outer
box, APIGEE_ENV is the green box, and APIGEE_HOST is the hostname on the
amber box. Mixing them up is the #1 first-hour mistake.
Where's my hostname?
In the Apigee console: Administration → Environments → Groups.
The hostname attached to eval-group is your public entrypoint.
2. Install the tooling
Google's CLI for Apigee — deploys proxies, creates apps/products, manages KVMs. Single binary.
3. Verify connectivity
apigeecli organizations list -t "$(gcloud auth print-access-token)" # (1)!
# → my-org-name

apigeecli environments list -o $APIGEE_ORG -t "$(gcloud auth print-access-token)" # (2)!
# → eval
apigeecliis the command;organizations listis a noun + verb pair (same shape asapis,products,kvms...).-tpasses an OAuth access token —gcloud auth print-access-tokenmints one from your login, and$( )substitutes its output in place. Seeing your org proves authentication and authorization work.-oselects the organization (the outer box in the diagram). Seeingevalproves the environment exists and your org name is right.
Alias the token
Every apigeecli call needs -t <token>. Save yourself the typing:
Tokens expire after ~1 hour — just re-export.
4. Deploy the labs proxy
The repo ships a complete bundle under examples/labs-proxy/:
deploy.sh first seeds the labs-config KVM (see
Lab 7) and then wraps a single apigeecli call:
apigeecli apis create bundle \
  -o "$APIGEE_ORG" -e "$APIGEE_ENV" \ # (1)!
  --proxy-folder apiproxy -n labs-proxy \ # (2)!
  -t "$TOKEN" --ovr # (3)!
- Where to put it: the organization, and the environment to deploy
into. Without
-eyou'd only import a revision, not run it. - What to import: the folder that contains
proxies/,targets/andpolicies/;-nbecomes the proxy's name in the org. -tauthenticates;--ovr("override") deploys the new revision over whichever one is currently live in that environment, so you can iterate without undeploying.
Under the hood: zip the folder → create revision N+1 → deploy it to
$APIGEE_ENV. See Proxy Anatomy for what is
inside that zip.
5. See it in action
Then open Apigee console → your proxy → Trace, start a session, and run
the curl again. You'll watch the request pass through each policy — this is
the single most valuable debugging habit to build early.
Troubleshooting the first deploy
| Symptom | Likely cause | Fix |
|---|---|---|
403 PERMISSION_DENIED from apigeecli |
Token expired or missing Apigee Admin role |
Re-export TOKEN; check IAM on the project |
curl returns Unable to identify proxy for host |
Hostname wrong, or env group not attached | Re-check the env group hostname in the console |
| Deploy succeeds, curl 404s | Proxy base path mismatch | labs-proxy serves under /labs — check proxies/default.xml |
DNS resolution failed on target |
mocktarget.apigee.net unreachable from runtime |
Swap target URL in targets/default.xml to https://httpbin.org |
Check yourself
1. Which of APIGEE_ORG, APIGEE_ENV, APIGEE_HOST appears in the curl URL, and which in apigeecli flags?
APIGEE_HOST is the URL host; APIGEE_ORG (-o) and APIGEE_ENV (-e)
are apigeecli flags only.
2. curl says Unable to identify proxy for host, but apigeecli apis listdeploy shows the proxy deployed. What do you check?
The hostname and environment-group attachment (is your env in the group?),
then the BasePath. Deployment is fine; routing is not.
3. Why does --ovr exist, and when would you not use it?
It redeploys in place for a fast dev loop. For promotion you deploy a
specific revision (apis deploy -v N) so the same artifact moves
between environments — see Deploy & CI/CD.
What's next
Read Proxy Anatomy — five minutes now saves confusion in every lab — then start Lab 1: First Proxy.